

Overview:
This is the Standard Operating Procedures for the restored bunker at Cabrillo National Monument.
What is commonly called the “Bunker” at Cabrillo NM is more accurately named the “Battery Commander and Base End Station, Battery Ashburn.” Built in 1943, it was where the officer in charge of Battery Ashburn worked. This station also served as the primary observation post for the battery. Since Battery Ashburn featured the biggest guns mounted in Point Loma, this bunker was an important part of the strategic defense of San Diego.
The current restoration of the bunker was entirely done by a group of volunteers at Cabrillo. All of the equipment is accurate to the time period of the bunker, and was researched and collected by the volunteer restoration crew. As such, everything inside the bunker needs to be treated with respect. Any damage to equipment must be immediately reported to park rangers.
Since this structure is now over 70 years old, the effects of time and weather now require procedures be followed to prevent further damage to the structure from wildlife intrusion and weather. The most significant threat is mice that enter the bunker. Generally, mice can pass through gaps of ¼ of an inch, roughly the same size as a pencil, and the shutters that close the viewports were not designed to close that tightly. To close these gaps, expanded metal mesh is used. The aim is to use enough of the mesh so that it fills up the gap, and gets pinched between the shutters so the mesh is locked into place.
General:
Keep in mind that this is a WWII-era military structure, and it is NOT designed to be “user friendly” in the way that 21stcentury structures are designed. Only qualified, trained persons should openthe bunker, as an unknowing person can unwittingly damage the bunker and the equipment inside it.
No more than 6 to 8 visitors should be inside the bunker at any one time. This bunker was designed to house 6 soldiers in each room, and more than this number creates a crowded condition, particularly with visitor unfamiliar with moving around inside small rooms. This is dangerous to both the visitors and the bunker. During busy periods, staff should be stationed at the top of the stairs to control the number of visitors entering the bunker.
All of the equipment and personal gear on display is either 70+ years old, or a uniquely reproduced item. These items were collected over many years by the volunteers that restored the bunker, and in most cases these items are difficult to replace. They are sensitive to abuse. Use common sense: if something is jammed, do not force it. Consumables (cigarettes, notepads, toothpastes, etc) should not be opened.
The light bulb in the bunk room is controlled by a pull chain located at the base of the light socket: pull it once to turn the light on, and pull it again to turn it off.
The light is powered by a battery located in the corner of the upper level. This battery can be ruined by allowing it to fully discharge, so the light must be turned offwhen the bunker is closed, and whenever the light goes out on its own. The battery is regularly recharged by the bunker volunteers every three months, or as needed.
Do not touch the battery unless polarity is fully understood; there is equipment that will be damaged if correct battery polarity is not observed.
Ladder:
The ladder between the upper and lower levels is most dangerous part of the bunker. It should NOT be used by anyone who is in doubt about their abilities to safely navigate it.
There is a gate mounted on a frame that protects the opening in the floor for the ladder. The gate must be kept fully closed and latched at all times during visitor hours.
There is also a removable wood hatch is placed over the ladder opening whenever the bunker is closed. This hatch sits inside a specially designed sill, so when it is properly fitted the hatch sits flush and level with the floor. Exercise caution when removing and replacing the hatch, it weighs over 10 pounds and cannot be properly fitted into the its sill without leaning out over the hatchway hole. Handle the hatch only by the handle attached to it, and always use one hand for the hatch, and the other hand to stabilize yourself on the railing around the hatchway. If you cannot safely maneuver the hatch with one hand, then DO NOT attempt to lift it.
When the hatch is not in place, it is stored between the front door of the bunker and the wall of the stairway.
Visitors can use the ladder to visit the lower level of the bunker, but only if the following conditions are met.
- There must be at least three persons staffing the bunker, and at least one person (but preferably two persons) must remain in the lower level whenever visitors are present. If one person is working the lower level, the forward part of the lower level should be roped off.
- The visitor must be 40 inches tall. This is to ensure the person can safely reach the ladder rungs.
- Visitors using the ladder must wear closed shoes: no “flip-flops” or other loose fitting shoes.
Visitors using the ladder should be encouraged to face the wall, hold onto the top rung with both hands, and step out with their left foot. Remind them to use one rung at a time, and not to skip rungs. Ensure that one visitor at a time uses the ladder; stepping on fingers is painful.
DO NOT ask visitors to use the ladder. Answer “yes” when a visitor asks to use the ladder only when there are enough volunteers. If a visitor is reluctant to use the ladder, acknowledge that reluctance and promote that it is OK not to go down the ladder. The bunker is a bad place for an accident and we must actively prevent anything from happening inside the bunker.
Below is the hatchway, with arrows pointing to the hatch sill where the hatch must fully be seated. The section of railing labeled “caution” at the right is the gate.
Viewport Shutters:
The most critical part of securing the bunker is the viewport shutters, due to the damage that can be caused by mouse intrusion and mishandled shutters. When bunker staffing is minimal, only the upper level shutters should be opened and not all shutters need to be opened.
Use care when handling the shutters, each one weighs about 20 pounds and allowing them to fall can damage the shutter hinges and the surrounding areas.
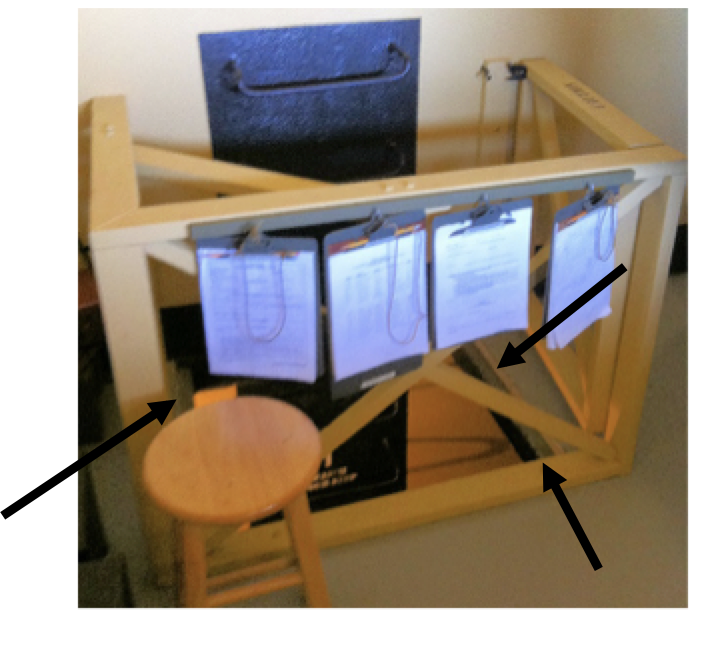
In the upper level, open the shutters from right to left, starting with the shutter circled below (the third shutter in from the farthest right). The two shutters in this picture still have their original hinges, and should be lowered with great care to help preserve them.

Some of the shutters are secured using turnbuckles. These are loosened by turning the body of the turnbuckle. One they are loose enough to allow the hooks to release, slip the hooks out of the anchor eyes mounted on the wooden board, and use the turnbuckles as handles to allow the shutter to be opened gently. There are small blocks of wood provided to place underneath the opened shutters to prevent strain on the hinges.
When closing the shutters, remember they always close from left to right. Ensure that mouse mesh bridges all the gaps between the shutters, and along the lower edges (see the arrows above). Also, check the other shutters; sometimes visitors disturb the mouse mesh elsewhere. Be sure all gaps larger than one quarter of a square inch are filled before leaving the bunker.
Tighten all wing nuts and turnbuckles finger tight, only. The anchors can be damaged by over-tightening.
Most of the anchor rods have washers under the wing nuts. To properly secure the shutters, all of the washers must be between the wing nut and anchor plate when the shutter is closed. If the washers cannot fit, then the shutter is not aligned properly. Large gaps between the shutters also indicate poor alignment.
Note that dryer sheets are used to back up the mouse mesh. Every time the shutters are opened, these sheets should be discarded, and replaced with new sheets. Extra sheets are stored in a drawer under the desk inside the upper level.
In the lower level; these shutters should NOT be opened if staffing is minimal, or if there is any doubt about how to close them. All of the hinges of the lower level shutters are broken, so great care must be taken when opening them. They will not close properly until they are precisely aligned, and these shutters are easily dropped to the ground outside the bunker.
The shutter immediately to the right of centershould be opened first (the one pictured below, note the center steel support). Note in the photo below that there are many gaps in this shutter that must be filled with mouse mesh. The gap in the lower right is particularly difficult to fill: when opening this shutter, pay particular attention to how the mesh is arranged so it can be replicated when the shutter is closed.

The shutter to the right of the one shown above may also be opened, but use extreme caution. Opening the second shutter can knock the first shutter to the ground and replacing it is very awkward. This process requires two people; one outside to lift the shutter, and the other inside to position it correctly. These shutters are heavy, so use extreme caution when lifting them. Also, be careful to avoid pinched fingers when closing the shutters.
When closing these shutters, they will not fit together unless great care is taken to align them properly. The weight of the shutters makes this difficult and time consuming, plan on spending 15 to 30 minutes per shutter to get them to close correctly.
As stated before, large gaps between shutters and washers that no longer fit between the anchor plate and wing nut are indicators of poor shutter alignment. This mustbe fixed before leaving the bunker.
Again, if in doubt, DO NOT OPEN the lower level shutters.
Telescopes:
The telescopes on display are actual Army spotting scopes that were once used in WWI and WWII. They are precision instruments and must be treated with great care.
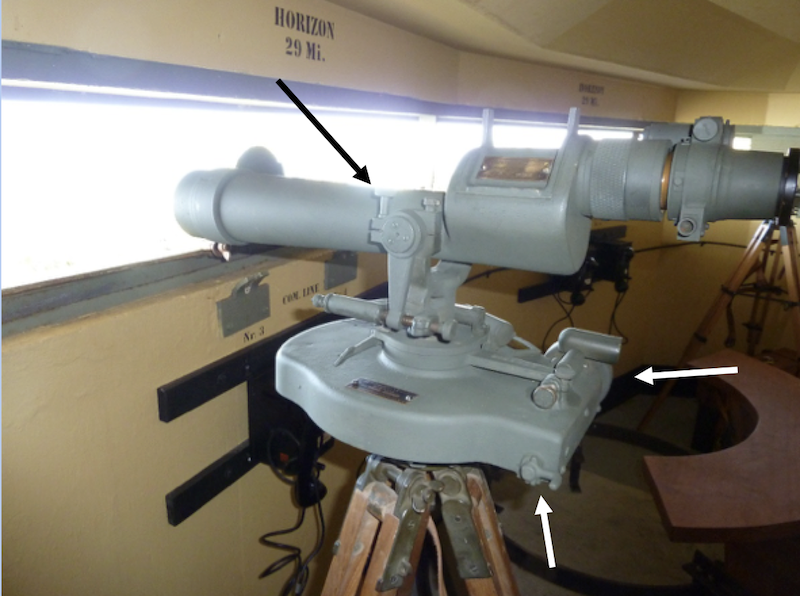
To pan the scope left and right, there is a crank handle on the right side of the base that turns (right-most arrow below). This is the azimuth control and it can be released by turning the toggle on the left side of the base (lower white arrow). To change the tilt of the scope, first loosen the tall lock screw on the left side (left black arrow), then adjust the angle of the scope and retighten the lock screw.
In general, all of these controls should be left loose and unlocked. This prevents damage to the scope when it is moved without understanding the controls. Use extreme caution when the telescopes are mounted on tripods. These tripods can collapse when bumped, and cause severe damage to the telescopes.
Before leaving the bunker: 1. unlock the azimuth and elevation controls, 2. close the front dust cap on the telescope, and 3. replace the cloth cover over both the scope and base.
Telescopes mounted on pedestals will remain there. Telescopes mounted on tripods will be dismounted from their bases and stored inside the scope’s leather case. Use caution when mounting telescopes: the scopes are heavy, and the clamps that hold the scopes use brass screws that can be damaged if tightened improperly.
Visitors may use the scopes. Be very vigilant, most visitors automatically tilt the scope upwards, however this prevents anything from being seen with the scope, and could ruin the scope and its mount. As they approach the scope, advise the visitors to place their hands only on the black-colored telescope pedestal and not to touch the telescope itself. Between visitors, aim the scope at a boat, or at the water, so there is something to look at without the visitor having to move scope.
Other Equipment:
All of the telephones inside the bunker are real WWII-vintage and should be treated with caution. The handsets are brittle and they shatter when dropped. Turning the ringer crank on these phones generates a high voltage that will damage the phone’s circuitry unless the telephone is connected.

The arrow indicates the only telephone whose ringer crank can be safely operated. Just like a modern land-line phone, the handset should be in its cradle at all times. Leaving the handset off its hook will eventually drain the battery that supplies power to the entire bunker.
The ringer crank handle will unscrew from the telephone if it is turned to the left (counter-clockwise). If this happens, the handle can be reinstalled by placing it back onto the shaft and turned to the right (clockwise).
The Time Interval (TI) Bell looks like a school bell and its operating circuitry is the grey metal box that is connected to a bell via wires. It is located near the battery. A red light on the grey box indicates when this circuit is active and it is turned on via a toggle switch on the side of the box. Be sure to turn the TI Bell off before closing the bunker.
Last revised 23-Jan-20
