
Uniform Standards At CNM
This is a garrison (not field) impression; all items should be clean and properly maintained. Non-fatigue uniforms should have military creases. Items are identified by the time period in which they were used: Early war = before the end of 1942. Late war = 1943 and after. All periods = correct for any time period during WWII. Please read through this guide completely before purchasing uniforms and equipment. Please note there are also guidelines for how and when to use this equipment; these are very important and must not be ignored.
Personal Appearance
A soldierly appearance is required: 1940’s military haircut. Clean shaven, or a 1940’s style mustache, NO BEARDS.
Headgear:


M1917 US “Kelley” Helmet

M1917A1 “Kelley” Helmet (difference is in the liner). Both helmets required for early war field uniforms. OK for late war coastal artillery, but considered obsolete by 1943.

M1 Helmet, unacceptable for early war, required for late war field uniform.

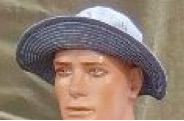
M1911 Campaign Hat with an artillery red cord around brim (not shown). Good for early war; OK, for late war, but considered obsolete. You can get either the expensive version with 5 rows of stitching on the brim, or the cheap one without the stitching. Get a chin strap. To install the strap: expand the hat’s eyelets in the brim, inset the strap’s leather ends through those eyelets, then place the red cord around the hat band, then loop the strap’s leather ends around the cord, back through the eyelets, and attach the leather end to itself.

Artillery-piped (red) Garrison Cover, with 19th Coast Artillery DI (see Insignia section). Made in both wool and khaki to match uniform in use, good for all periods. Insignia placed 2 inches up from bottom hem of cover, and 1 inch back from front crease.
Denim Blue fatigue hat. All periods, only worn with denim fatigue uniform

Herringbone Twill (HBT) cap, late war only. Officially only worn with HBT uniform.
Shirts:

M37 Wool Enlisted shirt. Worn for Early War with NO insignia other than rank, with or without black wool tie. The green tie shown here is late war. Note early war open-frame, black tipped belt buckle. Wool uniforms worn mid-fall to mid-spring. Will have a military press.

M1937 Khaki shirt, with or without a black tie for early war, or khaki (or green) tie for late war. Khaki uniforms worn mid-spring to mid-fall for clean jobs. Will have a military press, see notes. Note late war solid belt buckle with brass end.

Denim Blue Fatigue Shirt, all periods. Worn when doing dirty jobs (fatigue duty). No pressed military creases.
White Undershirt (not green). Any white t-shirt will do, as long as any art or lettering on it is not visible.
Trousers:

M37 Wool Trousers in Early Mustard shade, late-war belt shown here, wear with open buckle/black belt end for early war. Will have a military press.

M1942 HBT trousers, late war only. Used as a field (i.e. combat conditions) uniform, or for fatigue duties. Military press not needed.

Khaki trousers, all periods, late war belt shown here. Wear with open buckle for early war, the late war belt is shown here. Will have a military press

Denim Blue Fatigue Trousers, good for All Periods as a work uniform for dirty jobs (fatigue duty). No military press needed.
Jacket:

M41 Field Jacket, all periods. Worn without 9th Coast Artillery Patch on left shoulder for early war, with for late war. Will have rank chevrons on both sleeves.

M38 “Parsons” Field Jacket, early war only. Insignias worn same as M41 jacket.

M1942 HBT jacket, late war only. Used as a field uniform, or for fatigue duties. Worn with rank chevrons, but without unit insignia.
Overcoat:

Wool enlisted overcoat with brass buttons, with rank chevrons if applicable, but no unit insignia. All periods
Boots:

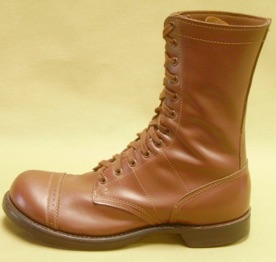
M1941 Garrison boots, early war.

“Roughout” boots, late war. Acceptable for early war, more common for late war.
Paratrooper boots are acceptable for early war only if worn with leggings over them. Acceptable “as-is” for later war, but unusual for artillery to wear them.
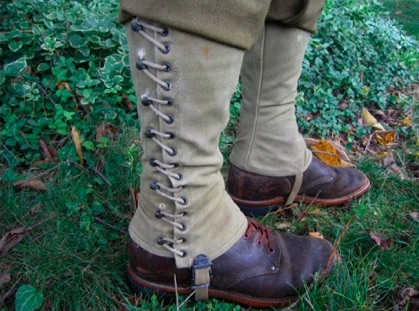
M37 Leggings. Tall version (shown here) correct for field uniforms of all periods, short version (not shown) correct only for late war.
WEB GEAR:
All web gear should be khaki, preferably of WWI manufacture for early war. Gear should be in serviceable condition and should not look torn up. Olive Drab colored web gear is correct for late war ONLY. All enlisted ranks (Privates through Corporals) will wear a Cartridge Belt (NO pistol belts). Sergeants have the option to wear a cartridge belt, or a pistol belt. Officers carry only pistols. Note that only the “REQUIRED” items should be bought initially, buy other items as needed.
All items are not required at all times. Match the appropriate duty uniform (dress, field, or fatigue) with the appropriate gear. For example; a field uniform in combat conditions requires a cartridge belt, full suspenders, and a weapon, while a fatigue (work) uniform requires no web gear at all. No weapon with a field uniform is correct for inside the bunker.
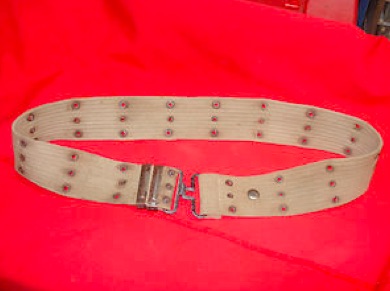
Web belt, the basis for all web gear, REQUIRED. All equipment mounts to this using a bracket that threads through the eyelets in belt. When mounting equipment, keep in mind there is a backwards way to mount the items that can destroy the belt if left uncorrected for long periods of time. Mounting should follow the natural curve of the belt.
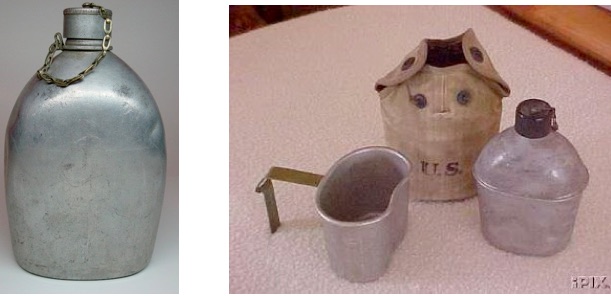
M1910 Canteen/cup with cover. Required. LEFT: aluminum capped canteen, early war. RIGHT: Plastic capped (late war) canteen, cup, and belt holder. Holder is same for all canteens. If in doubt, get the aluminum cap which is acceptable for all periods, but late war canteen carry water better.

Top: M1910 (early war). Bottom: M1923 (late war) cartridge belt. Required for privates, corporals, and when carrying a rifle.
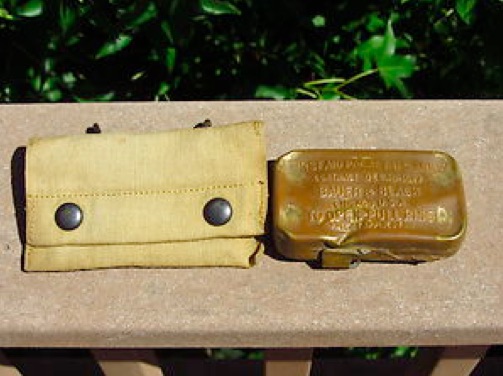
M1910 first aid pouch, early war, shown here with its original tin bandage container; the tin is strictly optional (and very expensive). This pouch is REQUIRED for early war, fill with a wood block, or tissue paper to simulate the container.

M1923 First Aid pouch, late war. required for late war.
When assembling the rifleman’s cartridge belt: place the first aid pouch towards the left–rear, the canteen towards right–rear, and bayonet on left hip.
When assembling a pistol belt: place the holster on the right hip, the first aid pouch centered at the back, the canteen at left-rear, and the pistol magazine pouch snapped to the left buckle area.

M1907 suspenders, early war.

M1936 Suspenders, late war; also rare for early war.
Both suspenders were used to distribute the weight of the loaded web belt to the shoulders when in combat or in the field. OPTIONAL, these were not normally used in garrison (non-combat) conditions.

M1910 Haversack. Early war, also called a “field” pack. OPTIONAL: these were not normally carried outside of combat and field operations. Seen here assembled with M1907 suspenders, T-handled shovel, rifleman’s cartridge belt, canteen and early war first aid pouch.

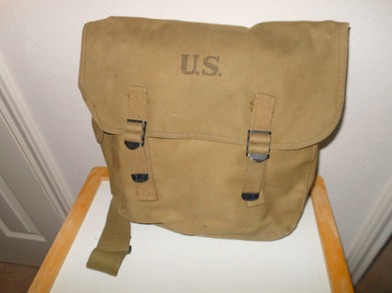
M1928 Haversack, late war field pack. Empty bottom sleeve holds a T-handled shovel. OPTIONAL: not normally carried outside of combat or field operations.
M1936 Musette bag, carried by sergeants or officers only. OPTIONAL, all period.
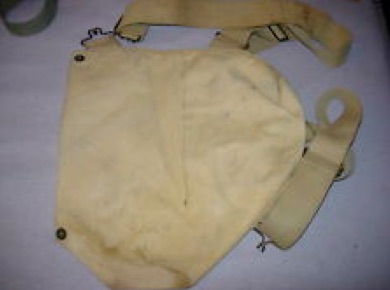
M4 Gas Mask “Kidney” bag: OPTIONAL, use extra shirt to fill out bag. Early war only.

Dismounted pistol belt holster with belt and magazine pouch (belt shown with late war first aid pouch attached). Carried by sergeants and officers only, all periods.
Personal Weaponry
Weaponry should be appropriate to the job being portrayed. When on sentry duty and doing nothing else, a rifle with fixed bayonet is correct. When walking around (i.e. off sentry duty), the bayonet should be sheathed, particularly when entering buildings and interacting with the public. When inside buildings for an extended period of time, weapons should be stored, e.g. rifles placed in racks. Pistols are to be carried only by sergeants and higher ranks.

M1905 16” Bayonet with WWI pattern canvas scabbard. Early war, carried when using Springfield rifle.

Springfield Rifle: 1903, or 1903A1, or 1903A2 for early war. 1903A3 late war only.

M1911 Colt 45, used by sergeants and officers only. Preferred for all time periods.

M1928 (drum magazine, early war) or M1 (straight magazine, late war) Thompson Submachine. Used by sergeants and officers only.

M1 Garand, late war only.

M1 Garand bayonet and scabbard, late war only.
Optics
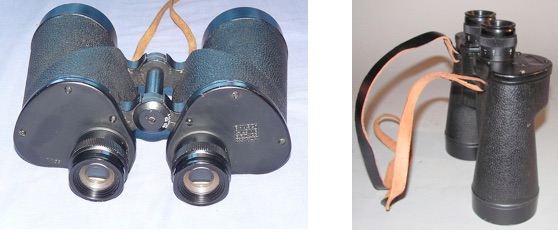
Bausch & Lomb 7×50 US Military Binoculars. Correct for all periods. OK to use if marked “US NAVY”, ARMY marking is rare.
Insignia

9th Coast Artillery (CA) district shoulder patch.

19th Coast Artillery Harbor Defense Regiment, Distinctive Unit Insignia (DUI or DI)
![]()
Wool rank insignia: wool stripes on wool backing. Used on all wool uniforms
Khaki rank insignia (on left): cotton back with embroidered stripe, used on khaki uniforms for all time periods. Dark backs and gold embroidery (on right) used for late war, commonly on HBT uniforms, but can be used on any cotton uniform. Rank insignia is sewn centered on sleeve, the length of a dollar bill from the shoulder seam.
What to Buy and When to Buy It
Start out buying the jacket, shirt, undershirt, trousers, headgear, and boots. These will get you started as cheaply and quickly as possible, portraying a private soldier. Observe the season when you’ll start so you get the right type of uniform; for winter the wool uniforms are used, for summer the cotton khaki uniforms are used. The garrison cap is a good first choice for headgear, but it needs to match the material of the uniform being worn, e.g. wool, or khaki. For early war events either the garrison cap, or campaign hat is correct. Get the leggings, web gear, and other items later.
If money is an issue, skimp on everything except boots. Good garrison boots are stiff when new; break them in by soaking the leather uppers in water, then spend a miserable day wearing them around the house as they dry. Once broken in, a good pair of garrison boots will be (at least) fairly comfortable and will last for decades.
Next buy unit insignias, minimum of one 9th CA patch and one 19th DI pin. The DI goes on your headgear: forward left side of the garrison cap 2 inches up from bottom and 1 inch back from the center crease, or front and center on the campaign hat just below the vent hole. If your DI has two clutch-type pins, cut the lower pin off before wearing it on your campaign hat, your forehead will thank you. Your first 9th CA patch goes on your M41 jacket, left shoulder. Other patches can go onto your shirt’s left shoulder for late war.
Rank insignia should be bought only AFTER a rank has been assigned, because we need to keep a balance of ranks in our group. Remember that the early war uniform shirts only carried rank insignia on them, they had no unit patch. The unit patch goes on your jacket, and the jacket can be worn with either the wool or khaki uniform. Late war shirts carried both rank and unit insignias.
Items like web gear, overcoats, dress uniforms, weapons and optics should be bought only after the basic field uniform is complete. These tend to be expensive and not completely necessary for the Coast Artillery living history program.
Where To Shop
What Price Glory (http://whatpriceglory.com) is the least expensive source, but quality can be inconsistent. When ordering from here, don’t be shy about returning items that don’t fit. The owner has a liberal exchange policy and it pays to be patient with him.
WWII Impressions (http://www.wwiiimpressions.com/) has outstanding quality, and the best accuracy, but is also very expensive.
At The Front (http://www.atthefront.com/) has good quality and prices are good.
Hessen Antiques (http://www.hessenantique.com/) has a limited selection of US Army items; prices are cheap, quality is generally good, but it can vary.
In general, it’s better to pay a bit more and get a quality item. The suppliers listed here all carry accurate items that will last a long time given the light duty they’ll see at the Park. When in doubt, contact any of the experienced re-enactors; we have all made mistakes when buying items and we can help you avoid making those mistakes yourself.
HOW TO GET MILITARY CREASES.
We require our cotton khaki and wool uniforms (but NOT HBTs and denims) to have military creases. This can be done by your local dry cleaners, or you can do it yourself. The military crease for trousers is a crisp, centered, single crease on both the front and back. The shirt is more complex, with creases centered on each front panel, three evenly spaced creases on the back panel, and the sleeves creased top and bottom. Refer to the picture, but realize your creases will run straight, without the sideways kink shown here.
 These creases require the use of clothing starch, particularly with cotton. There are two ways to apply starch. The first is to wash and dry the clothing in the normal way, and then prepare a good quality spray bottle with a starch/water mix, which is applied as a light, even mist to the garment. This runs the risk of starch drips causing discoloration of your fabric. The other way is to add the starch to the final rinse cycle of your washing machine. This takes a long time because you can’t machine-dry starched clothing without ruining the starch.
Prepare the ironing board, your iron and your starch sprayer (if that’s what you’re using) before your clothes are dry. If you wait until after the dryer is done, your clothes will cool off and any wrinkles left from washing will set when the garment cools. Also, be sure the iron is set at the right temperature for the material; hotter for cottons, cooler for wools.
To start, we will talk about pressing the shirt, since that is the most complicated press you’ll have to do. The trousers are relatively simple and will be covered later. You will be doing a lot of folding, so be sure that you’re only folding and ironing the areas you want to work on, and that all other areas aren’t pinched or caught under the part you’re currently working on.
Start by spraying a light, even mist of water/starch mix onto your shirt. Getting an even coat is critical because globs of starch show as discolorations that can only be corrected by washing and starting over from scratch. This is why some people use the rinse cycle to apply the starch.
Next, iron out all the wrinkles left from the wash. Don’t worry about the military creases right now; you are only removing the small wrinkles in the shirt. Do this quickly because the starch sets when heated, which will make the wrinkles more difficult to remove and the creases harder to set.
Next create the front creases. If you’re using the spray technique, start by spraying another light layer of starch on the shirt. Then fold the front quarter of the shirt in half, placing the edge of the shirt next to the side seam, parallel to the front buttons, and using the center of the front pocket as a reference. This fold will run the entire length of the shirt, top to bottom. Press the iron into the fold to create the crease and add more starch as necessary until the creases are set in place. Do this for both sides of the front of the shirt.
Start on the back creases by folding the shirt in half to create the central crease. Be careful to ensure both sides are equal. Once the central back crease has been made, the next step is to create side creases. Do this by folding one side seam of the shirt to the center crease that you have just finished. Do one crease at a time and be sure these folds are even before setting them.
The sleeves are ironed with upper and lower creases, with the upper running from the shoulder to the cuff, parallel to the seam and through the center of the rank insignia. The lower crease is made opposite of the upper crease. Don’t forget to iron the collar and cuffs, but these don’t get creases, you only need to smooth them.
When ironing the trousers, if the pocket flaps are not sewn down begin by ironing them flat. Move on to the front and seat of the pants using quick, short strokes to remove any wrinkles left from washing. Then hold the pants up by the bottom of one leg and line the fabric up so that the crease is precisely centered between the seams at the hem, then maintain this alignment when placing the trousers on the ironing board. Be patient, it can be done, but requires a bit of practice.
Some important pointers:
Be sure to locate the creases accurately before setting them with the iron. If you miss, trying to reset it gets you the dreaded double-crease, which is a very obvious mistake and difficult to correct. If a mistake is made when locating a crease, your only solution is to completely iron out the incorrect crease and try again from scratch.
Avoid ironing over the buttons, they will dig into the surrounding material and make unsightly wrinkles. If you can’t avoid the buttons, use a clean towel under them as a cushion.
Yes, you will crease the insignias on your sleeve. The crease should run down the exact center of the chevrons, if it doesn’t then reposition the chevrons. Creasing the thick wool rank chevrons can be difficult, do the best you can while keeping the rest of the sleeve looking neat and tidy. Don’t destroy your shirt sleeves trying to do the impossible.
Keep the iron moving to avoid polishing cotton fabric. If your iron causes the fabric to become shiny, try ironing through clean, brown paper bag material that has been wetted. Or use the steam option on your iron and less pressure on the fabric.
Steam is your friend, particularly when ironing wool. Steam helps get the heat all the way through the material, and speeds the material accepting the crease. The faster the creases are set, the less likely it will be to polish the material, or get a double crease. Cheap irons don’t make steam very well, and some will drip water. If this is happening to you, either get a better iron, or go pay the cleaners to do your military press. Sometimes spraying a light mist of water works on wools to get steam, but that can lead to wet clothes.
Last revised 30-Jan-23
